RackHD Virtual Stack Environment Setup
Table of Contents
Setup a Docker Based RackHD Environment
There are various ways to install RackHD, including install from debian package, VMWare OVA, Docker or Vagrant Box.In this Lab, you can experience the steps of “install from docker”. For more detail about installation please refer to Installation.
Network Topology Overview
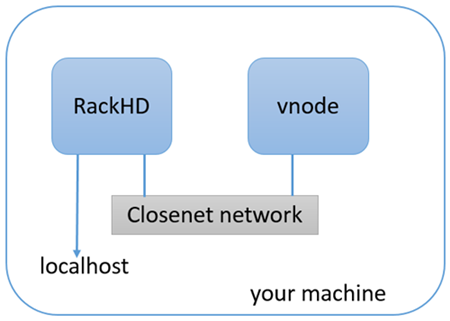
The Docker Compose file will download the latest released versions of the RackHD Services from the RackHD DockerHub. It will create two docker bridge networks to run the services. The rackhd_admin network will be used to connect the services together and to access the RackHD APIs. The rackhd_southbound network will be used by RackHD to connect to the virtual nodes. The Docker Compose setup also enables port forwarding that allows your localhost to access the RackHD instance:
- localhost:9090 redirects to rackhd_admin:9090 for access to the REST API
- localhost:9093 redirects to rackhd_admin:8443 for secure access to the REST API
Install RackHD with docker-compose
There are four ways to install RackHD:
- From Docker
- From Debian
- From NPM package
- From source code
For vLab specific, we use docker to install RackHD services, for other installation methods please refer to summary in this section.
cd ~/src/RackHD/example/rackhd
sudo docker-compose up –d

# Check RackHD services are running
sudo docker-compose ps

#  Sample response:
#
#  Name                      Command                                    State                 Ports
#  --------------------------------------------------------------------------------------------------------------
#  rackhd_dhcp-proxy_1     node /RackHD/on-dhcp-proxy ...               Up
#  rackhd_dhcp_1           /docker-entrypoint.sh                        Up
#  rackhd_files_1          /docker-entrypoint.sh                        Up
#  rackhd_http_1           node /RackHD/on-http/index.js                Up
#  rackhd_mongo_1          docker-entrypoint.sh mongod                  Up      27017/tcp, 0.0.0.0:9090->9090/tcp
#  rackhd_rabbitmq_1       docker-entrypoint.sh rabbi ...               Up
#  rackhd_syslog_1         node /RackHD/on-syslog/ind ...               Up
#  rackhd_taskgraph_1      node /RackHD/on-taskgraph/ ...               Up
#  rackhd_tftp_1           node /RackHD/on-tftp/index.js                Up
The command sudo docker-compose logs will output the logs from all the running RackHD services. Additionally, you can stop the services with the command sudo docker-compose stop, or stop and delete the services with sudo docker-compose down.
Setup a Virtualized Infrastructure Environment
Infrasim Overview
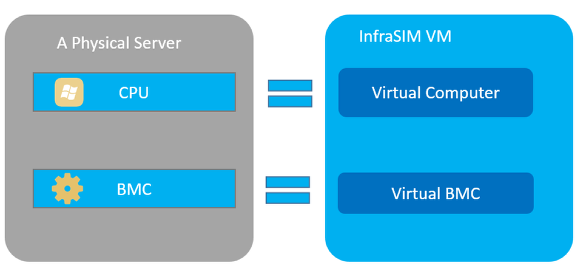
InfraSIM is a hardware simulator environment that is used in this lab to simulate physical servers with a BMC. The diagram above shows the relationship of physical server to virtual server in InfraSIM so the user gets a general understanding of the virtual node. A physical server is made up of two sub-systems, one for data and the other for management. The data sub-system consists of the host CPU, memory, storage, and IO. This is where OS and Applications run. The management subsystem consists of the BMC and this provides the Out-Of-Band management to remotely control the physical server. Like a physical server, the virtual server has the equivalent sub-systems. However, in the virtualized environment, the data sub-system is accomplished with a virtual machine and the management sub-system is accomplished with “qemu” and “ipmi_sim” applications running in a VM. We refer to the data sub-system as “Virtual Computer” and the management sub-system as “Virtual BMC”. See diagram above.
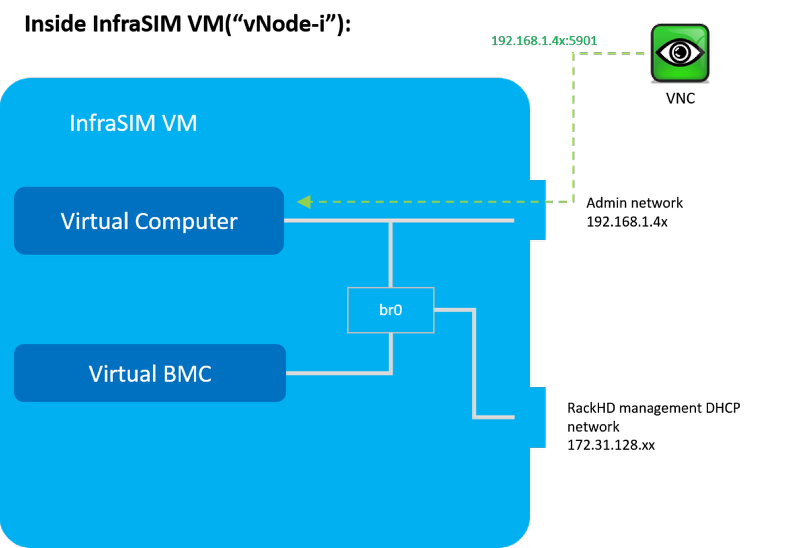
As shown, there are 2 network adapters in the InfraSIM docker container. The first one is connected to the external network and the second one is connected to RackHD’s DHCP network. For the “server CPU” it simulates, you can use VNC to interact with its console on first NIC port (xxx.xxx.xxx.xxx). However, there should be a bridge (br0) so that InfraSIM can run normally
Start-up Docker based vStack
cd ~/src/RackHD/example/infrasim
sudo docker-compose up –d

# Sample response
# 610b9262a5ed infrasim_infrasim1 ... 22/tcp, 80/tcp infrasim_infrasim1_1
# 7b8944444da7 infrasim_infrasim0 ... 22/tcp, 80/tcp infrasim_infrasim0_1
For example, we choose infrasim_infrasim0_1, use following command to retrieve its IP Address.
sudo docker exec -it infrasim_infrasim0_1 ifconfig br0

# Sample response
# br0 Link encap:Ethernet HWaddr 02:42:ac:1f:80:03
#     inet addr:172.31.128.112 Bcast:172.31.143.255 Mask:255.255.240.0
#     UP BROADCAST RUNNING MULTICAST MTU:1500 Metric:1
#     RX packets:2280942 errors:0 dropped:0 overruns:0 frame:0
#     TX packets:2263193 errors:0 dropped:0 overruns:0 carrier:0
#     collisions:0 txqueuelen:0
#     RX bytes:207752197 (207.7 MB) TX bytes:265129274 (265.1 MB)
Note
If br0 is not available, use sudo docker-compose restart to restart the vNodes.
Here 172.31.128.112 is infrasim_infrasim0_1’s BMC IP Address.
In order to connect to vNode from “UltraVNC Viewer” vnc_forward script should be executed.
./vnc_forward

# Sample response
# ...
# Setting VNC port 28109 for IP 172.31.128.109
# Setting VNC port 28110 for IP 172.31.128.110
# Setting VNC port 28111 for IP 172.31.128.111
# Setting VNC port 28112 for IP 172.31.128.112
# Setting VNC port 28113 for IP 172.31.128.113
# Setting VNC port 28114 for IP 172.31.128.114
# ...